
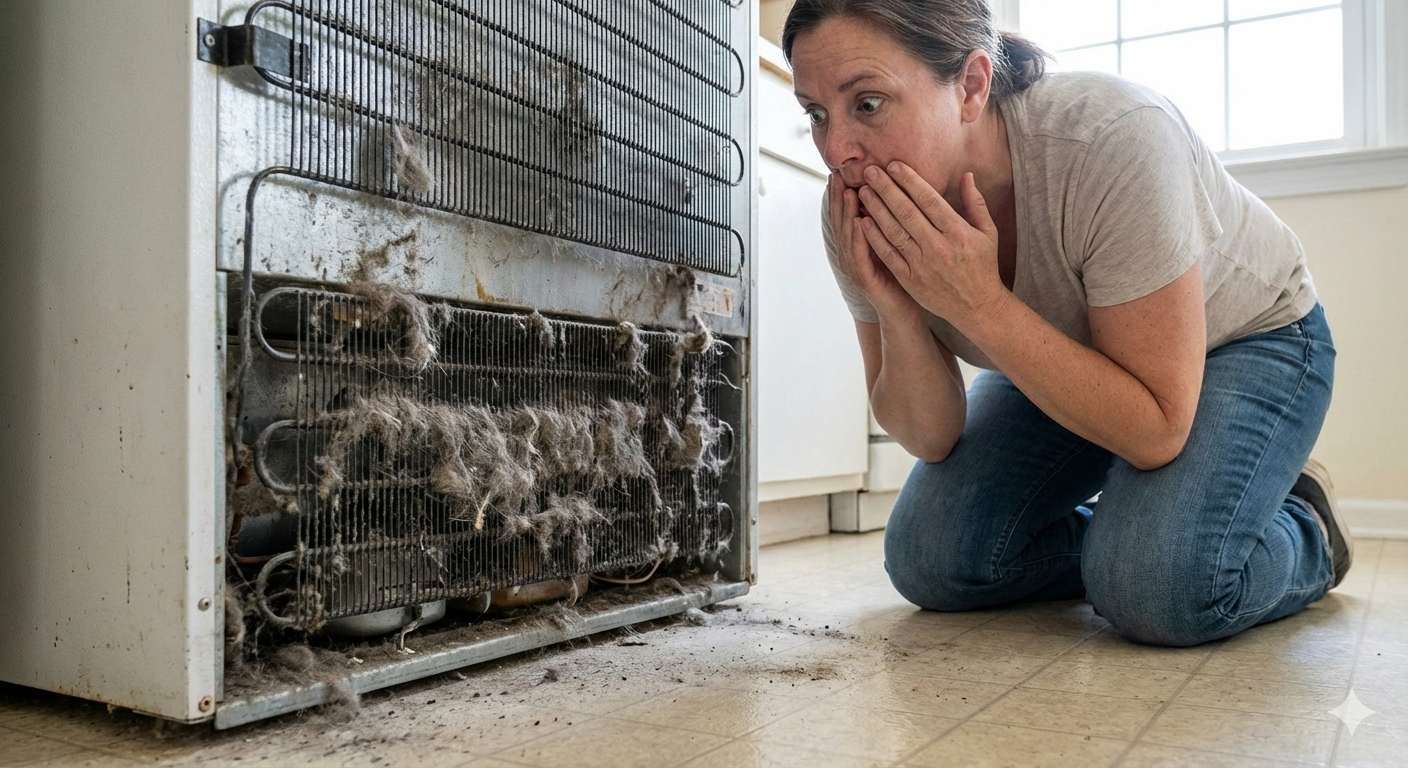
Dirty refrigerator coils waste energy and shorten your fridge's lifespan. This guide walks you through cleaning them in about 10 minutes using a coil brush and vacuum. Learn where to find the coils, how to clean them safely, and how often to repeat the process.
How to Clean Refrigerator Coils: A 10-Minute Fix That Saves Money
TL;DR
Dirty refrigerator coils force your fridge to work harder, raising energy bills and shortening its lifespan. Cleaning them takes about 10 minutes with a coil brush and vacuum. Pull the fridge away from the wall (or pop off the front grille), brush loose dust from the coils, vacuum the debris, and replace everything. Do this every 6-12 months to keep your fridge running efficiently and avoid costly repairs.
The Short Answer: How Do You Clean Refrigerator Coils?
Unplug the fridge, locate the coils (usually on the back or behind the bottom front grille), brush off the dust with a refrigerator coil brush, vacuum up the loosened debris, and plug it back in. The whole process takes about 10 minutes and requires no special skills.
If you've never cleaned your coils - or can't remember the last time you did - there's a good chance they're caked with dust, pet hair, and grime. That buildup acts like an insulating blanket, trapping heat that your compressor is desperately trying to release. The result is a fridge that runs longer, works harder, and dies sooner. Cleaning the coils is one of the simplest and most impactful pieces of appliance maintenance you can do at home.
Why Dirty Coils Are a Bigger Problem Than You Think
Your refrigerator doesn't actually "create" cold air. It removes heat from inside the cabinet and releases that heat into your kitchen through the condenser coils. When those coils are buried under a thick layer of dust, the heat has nowhere to go. The compressor has to run longer cycles to maintain temperature, which drives up your electricity bill and puts unnecessary strain on the most expensive component in your fridge.
According to appliance repair professionals, dirty coils are one of the top reasons refrigerators fail prematurely. A fridge that should last 15-20 years might only make it 10 if the coils are never cleaned. Some estimates suggest that dirty coils can increase energy consumption by up to 25 percent. For a typical household, that translates to an extra $50-$150 per year in electricity costs - money you could reclaim with 10 minutes and a brush.
Beyond the financial hit, a struggling compressor also means inconsistent temperatures inside the fridge. You might notice food spoiling faster, ice cream getting soft in the freezer, or the motor running almost constantly. These are all signs that the coils need attention.
What You'll Need
Gathering your supplies before you start makes the job faster and smoother. You don't need anything specialized, and most of these items are already in your home.
Tools and Materials
A refrigerator coil brush is the most helpful tool for this job. It's a long, narrow brush (usually around 27 inches) designed to reach between tightly spaced coil fins. You can find one at any hardware store or online for about $8-$12. A vacuum cleaner with a crevice attachment handles the loosened dust and debris. You'll also want a flashlight to see what you're working with, and optionally a damp cloth for wiping down the surrounding area afterward.
If you don't have a coil brush, a long-handled bottle brush or even a clean paintbrush can work in a pinch, though they won't be quite as effective on tightly packed coils.
Step-by-Step: How to Clean Refrigerator Coils
Step 1: Unplug the Refrigerator
Safety comes first. Pull the power cord from the wall outlet before you do anything else. If the outlet is hard to reach, switch off the circuit breaker that powers the fridge. This protects you from electrical shock and prevents the compressor from kicking on while you're working near moving parts.
Don't worry about your food - a closed fridge maintains its temperature for about four hours, and this job takes a fraction of that time.
Step 2: Locate the Coils
Refrigerator coils are in one of two places depending on your model. On older fridges, they're typically mounted on the back of the unit, visible as a grid of black tubing. On most modern refrigerators, the coils are located underneath the unit, behind a front grille (also called a toe kick or base grille) at floor level.
To check underneath, look at the very bottom of your fridge's front face. If you see a snap-on grille panel, the coils are behind it. Gently pull the grille toward you or press the release clips on either side to pop it off. If there's no grille, pull the fridge away from the wall and check the back panel.
Step 3: Brush the Coils
Insert the coil brush between the coil fins and gently work it back and forth. The bristles will grab dust, pet hair, cobwebs, and other debris that has accumulated over time. Work from top to bottom if the coils are on the back, or from front to back if they're underneath. Be thorough but gentle - the coil fins can bend if you apply too much force, and bent fins reduce airflow just like dust does.
You'll likely be surprised (and maybe a little horrified) by the amount of buildup that comes off, especially if this is your first time cleaning the coils.
Step 4: Vacuum the Debris
Use the crevice attachment on your vacuum to suction up the dust and debris the brush dislodged. Run the attachment along the coils themselves, across the floor area beneath the fridge, and around the compressor and fan if you can reach them. A shop vac works even better if you have one available, since the debris can include clumps of compacted dust that might clog a standard vacuum filter.
Step 5: Wipe Down and Reassemble
Use a damp cloth to wipe down the area around the coils, including the floor where the fridge sits and the back wall. Dust tends to accumulate in these spots and will migrate back to the coils quickly if you leave it. Snap the front grille back into place (or push the fridge back against the wall), plug it in, and you're done.
Listen for the compressor to kick on. It should sound normal - a smooth, steady hum. If it sounds strained or louder than usual, double-check that nothing is blocking the coils or fan.
How Often Should You Clean Refrigerator Coils?
The standard recommendation is every 6-12 months, but your household might need a different schedule. Homes with pets, especially dogs and cats that shed heavily, should lean toward every 6 months or even quarterly. Pet hair is a magnet for coil buildup and accumulates much faster than ordinary household dust.
Similarly, if your fridge is in a dusty environment - a garage, a basement workshop, or a kitchen that sees a lot of cooking activity - more frequent cleaning keeps things running smoothly. On the other hand, a fridge in a clean, pet-free home with good air filtration can typically go a full year between cleanings.
A simple test: pull off the grille and shine a flashlight on the coils. If you can see a visible layer of dust or hair, it's time to clean regardless of when you last did it.
Signs Your Coils Need Cleaning Now
Sometimes the fridge itself tells you there's a problem before you ever look at the coils. Knowing these warning signs can help you act before a minor maintenance task becomes a major repair.
Higher Energy Bills
If your electricity costs have crept up without an obvious explanation, a hard-working refrigerator compressor could be the culprit. Since the fridge runs 24 hours a day, even a small increase in its energy draw adds up fast over a billing cycle.
The Fridge Runs Constantly
A properly functioning refrigerator cycles on and off throughout the day. If you notice the motor humming continuously or the fridge rarely going silent, the compressor is likely struggling to maintain temperature - and dirty coils are the most common cause.
Food Isn't Staying Cold Enough
Milk going bad before the expiration date, lettuce wilting faster than expected, or ice cream with a strange texture can all point to inconsistent cooling. Before calling a repair technician, check the coils. You might save yourself a $150 service call.
Coil Cleaning vs. Professional Refrigerator Service
For most households, cleaning the coils is a straightforward DIY job. But there are situations where calling a professional makes more sense.
DIY coil cleaning is a good fit if you're comfortable pulling the fridge out or removing the grille, the coils are reasonably accessible, and there are no other symptoms like leaking water, unusual noises beyond the compressor hum, or a burning smell.
Call a professional if the coils are heavily corroded, the compressor continues to run constantly after cleaning, you notice refrigerant leaks (oily residue near the coils), or the fridge is still underperforming after a thorough coil cleaning. A certified appliance technician can diagnose deeper issues like a failing compressor, a clogged capillary tube, or a faulty condenser fan motor.
Think of coil cleaning as the oil change of refrigerator maintenance - it's routine, it's easy, and it prevents most problems. But just like a car, sometimes you need a mechanic for the bigger stuff.
Key Takeaways
-
Dirty coils make your fridge work harder. Dust and debris insulate the coils and trap heat, forcing the compressor into longer cycles that waste energy and shorten the appliance's lifespan.
-
Cleaning takes about 10 minutes. All you need is a coil brush, a vacuum with a crevice attachment, and a flashlight. No special skills or expensive tools required.
-
Coils are either on the back or underneath the fridge. Check for a removable front grille at the base of the unit first - that's where most modern fridges house their coils.
-
Clean every 6-12 months, more often with pets. Homes with shedding animals or dusty environments should clean quarterly to prevent rapid buildup.
-
Watch for warning signs. Rising energy bills, a constantly running motor, and food that isn't staying cold are all signals that the coils need attention.
-
This one task can save you hundreds of dollars. Between lower energy bills and fewer repair calls, regular coil cleaning is one of the highest-return maintenance habits you can build.
Regular coil cleaning is the kind of small effort that pays off in a big way. Your fridge works better, your food stays fresher, and your wallet stays a little heavier.
Want to catch appliance problems early?
Get The Appliance Survival Kit — a simple system to spot issues before they become emergencies.
Learn More — $27